// Watch a video tutorial on videos page
How to establish a connection between front end and back end in just 10 Steps.
In my case, front end is Java GUI(using NetBeans IDE) and back end is MySql.
 |
| Database Connectivity(JDBC) |
Steps :-
1 Create a database in your RDBMS(MySql in this example)
2 Create a table and insert some rows.
3 Open NetBeans and create a project
4 Add ‘MySql JDBC Driver’ Library in your project(Right click on project icon » Properties » Libraries » Add Library » MySql JDBC Driver).
5 Create a new JFrameForm under the project.
6 Insert a JTable swing component.
7 Edit it’s content according to your requirement(Right click » choose Table Contents).
8 Under your package and before class starts write the following codes in the source tab.
import java.sql.*;
import javax.swing.JOptionPane;
import javax.swing.table.DefaultTableModel;
9 Insert a button to view the data when we click.Write the coding on the button’s actionPerformed event.
DefaultTableModel model=(DefaultTableModel) jTable1.getModel();
String sql=”Select * from Table_name“;
try {
Class.forName(“com.mysql.jdbc.Driver”);
Connection con= (Connection) DriverManager.getConnection(“jdbc:mysql://localhost:3306/yourdatabasename“,”yourmysqlid“,”yourmysqlpassword“);
/*As we are creating a connection on a local computer we will write the url as jdbc:mysql://localhost:3306 */
Statement stmt=con.createStatement();
ResultSet rs = stmt.executeQuery(sql);
while (rs.next())
{
String no = rs.getString(“NO”);
String title= rs.getString(“TITLE”);
String auth= rs.getString(“AUTHOR”);
String type= rs.getString(“TYPE”);
String pub= rs.getString(“PUB”);
String qty= rs.getString(“QTY”);
String amt= rs.getString(“AMOUNT”);
model.addRow(new Object []{
no,title,auth,type,pub,qty,amt});
}
}
catch(Exception e) {
JOptionPane.showMessageDialog(this, e.getMessage());
}
10 Change the codes in blue according to your database.
Run the file and you are done to view the contents in your database in GUI environment.
Please comment if you are facing any problem.
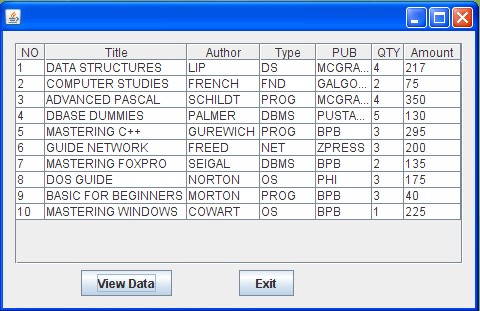 |
| Run View |
If this post helped you just give your few seconds in sharing this so that others could be helped too.
What if i want to do the same thing but use postgreSQL instead of Mysql,
waht changes will i need to make to your current code
thanks
@Khanny the library and the connection URL for DriverManager will change..
@Anonymous
model.setRowCount(0);
Add the above code BELOW the line DefaultTableModel model=(DefaultTableModel) jTable1.getModel();
@Anonymous u have not imported the correct library
@Anonymous try reconfiguring your mysql settings.
It's already there on the blog Java Database Connectivity : Inserting Data
How to connect to Access Database Table using this code.
thanks it is very helpful .plz also post report generation in mysql with java as front end.
@Anonymous
i think you have not followed the 7th step…
So, In the design mode right click your table and select Edit Contents and choose 0 as the number of rows
Can you please tell the code when the back end is access or excel.
or how to convert database in excel to My sql??
plz rply ASAP..
How to clear the data which has been viewed and display or view contents of another table..??
I have my connect jframe working and connecting. What I can do to maintain the connection and open the new window automatic to start the search? Both jframe are working property with the ResultSet in the second frame. Thank you.
@author: I want to populate my JTables from my dataBase….
Can you give some idea? Thankyou..
Also, when i add/update/delete data i want to refresh those jTables.. and Jlists(in case of deletion) at the same form..
anyone provide me full source code please
can dis code be also applied for ecllipse??
sir can u plz send me java in frontend & oracle in backend connectivity steps…i made a project using netbeans ide…still it is not connecting to database ,i have already used connectivty videos on you tube. plz help me sir…
DefaultTableModel model = (DefaultTableModel)mdel.getModel();
cannot find the symbol is reporting when it is s tried using javafx…
help me out asap
The code works great, but when I selected view data, it gave me there error that my Table did not exist. I have created a table in the MySql database and everything was connected. I have also entered the table name and Db name correctly in the code. I even tried changing to upper and lower case. No Joy. Any help is appreciated.
Thank you bro you saved my time…
great tutorial…
but unfortunately neither i am able to view the data nor i am getting any error or exception… as i press the View data button, after few seconds of execution i get a dialog box:
"Communication Link Failure: The Last Packet Sent Successfully to the Server was 0 milliseconds ago. The driver has not received any packets from the Server. "
Kindly assist me through it and tell me how to correct my mistake plzzzz?
Thanks!
Re-configure your mysql server and verify that it's running on the 3306 port and also check the box which says 'Install MySQL as Windows Service'
Its saying build successful but im not able to view anything in my table even when I press the button!!
Make sure you are connecting with right database and table which contains data. Also see the Output window in NetBeans to check if there is any error.
how to display the data into another form?
how to link a pdf file with my java software??
Good one, very good examples, you may please provide some other examples for better understanding of the GUI and mysql connecting environment.
the data is getting viewed only after i click into the table one by one. can u help me with this error