
The JFileChooser Swing component let’s users explore files on their system. It provides a GUI similar to Windows Explorer found in Windows or Nautilus in Ubuntu. It allows users to navigate through their file system and choose the desired file/directory.
You can use a JFileChooser to open or save files from/to a location which is chosen by the user. Here’s a complete guide explaining the use of JFileChooser and it’s important properties.
Before we begin, one important thing to note is that JFileChooser is a modal dialog. Whenever a modal dialog is displayed the program execution is paused until an action occurs on the user part. For Ex:
showJFileChooserDialog();
System.out.println(“I have to WAIT until an action by the user”);
Let us begin with a simple application scenario where you want to display the user’s picture on your app’s form. Here’s the design view of the sample app we gonna develop.
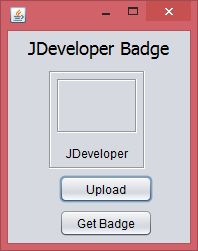
# First, we let users to select their desired profile picture through our customized JFileChooser.
# Then, we will render the selected image in a JLabel placed within a JPanel.
# Another JLabel will serve as caption/description to the image.
# Finally, users can save the output image (which includes the caption) at their desired location.
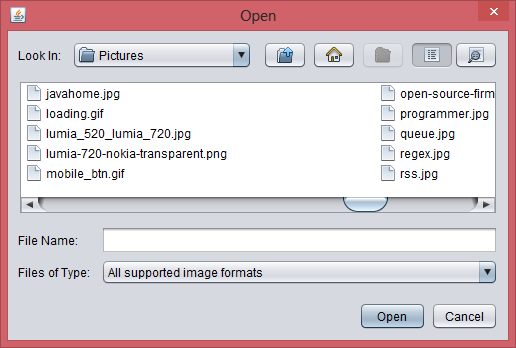
Creating a Open Dialog
Create an actionPerformed event for the Upload button. If using NetBeans IDE just double click the button to enter it’s actionPerformed event. Place the below code to show a standard open dialog:
|
1 2 3 4 5 6 7 8 9 10 11 12 13 14 15 16 17 18 19 20 21 22 23 24 25 |
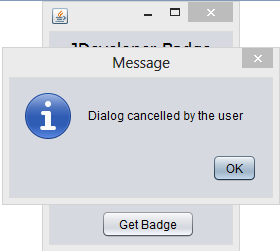
JFileChooser chooser = new JFileChooser(); chooser.setFileSelectionMode(JFileChooser.FILES_ONLY); // JFileChooserEx is the name of the JFrameForm/Java class int res = chooser.showOpenDialog(JFileChooserEx.this); if (res == JFileChooser.APPROVE_OPTION) { File file = chooser.getSelectedFile(); // Creating ImageIcon out of the selected file ImageIcon image = new ImageIcon(file.getAbsolutePath()); // Get width and height of picLabel Rectangle rect = picLabel.getBounds(); // Scaling the Image to fit in the picLabel Image scaledImage = image.getImage().getScaledInstance(rect.width, rect.height, Image.SCALE_DEFAULT); // Converting the image back to ImageIcon to make it acceptable by picLabel image = new ImageIcon(scaledImage); picLabel.setIcon(image); } else { JOptionPane.showMessageDialog(this, "Dialog cancelled by the user"); } |
Run this file by pressing Shift + F6. As soon as you click the upload button, an instance of JFileChooser appears as a popup window(modal dialog).
Now, if you select an image and click on Open, your image will be rendered on the picLabel.
Whereas, if you click on cancel you will be greeted by the message “Dialog cancelled by the user” – whether you selected an image or not, it doesn’t matter in this case.
The above code would be sufficient for the required work however it’s not the code you might want to end up with as it contains one major flaw. By default the JFileChooser displays all files and directories so a user doesn’t know which files are actually supported by your app. To provide a hint to the user you could create a file filter with the supported file formats. A file filter provides a description for the ‘Files of Type’ field and displays only that files that are supported by your app. So, let us modify the above code and add a file filter to our chooser.
Setting up a File Filter
|
1 2 3 4 5 6 7 8 9 10 11 12 13 14 15 16 17 18 19 20 21 22 23 24 25 26 27 28 29 30 31 32 33 34 35 36 37 38 39 40 |
JFileChooser chooser = new JFileChooser(); chooser.setFileSelectionMode(JFileChooser.FILES_ONLY); chooser.setFileFilter(new FileFilter() { @Override public String getDescription() { return "Portable Network Graphics (*.png)"; } @Override public boolean accept(File f) { if (f.isDirectory()) { return true; } else { return f.getName().toLowerCase().endsWith(".png"); } } }); int res = chooser.showOpenDialog(JFileChooserEx.this); if (res == JFileChooser.APPROVE_OPTION) { File file = chooser.getSelectedFile(); // Creating ImageIcon out of the selected file ImageIcon image = new ImageIcon(file.getAbsolutePath()); // Get width and height of picLabel Rectangle rect = picLabel.getBounds(); // Scaling the Image to fit in the picLabel Image scaledImage = image.getImage().getScaledInstance(rect.width, rect.height, Image.SCALE_DEFAULT); // Converting the image back to ImageIcon to make it acceptable by picLabel image = new ImageIcon(scaledImage); picLabel.setIcon(image); } else { JOptionPane.showMessageDialog(this, "Dialog cancelled by the user"); } |
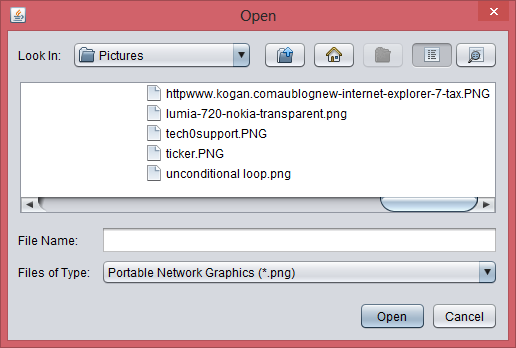
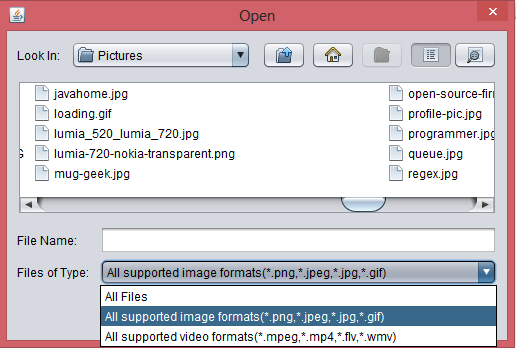
The above code when applied will display all directories but only those files which have file format as .png. As our app can support all standard image formats we have no good reason to present only png images. So, let’s edit our code and make our File Filter to support multiple image formats.
|
1 2 3 4 5 6 7 8 9 10 11 12 13 14 15 16 17 18 19 |
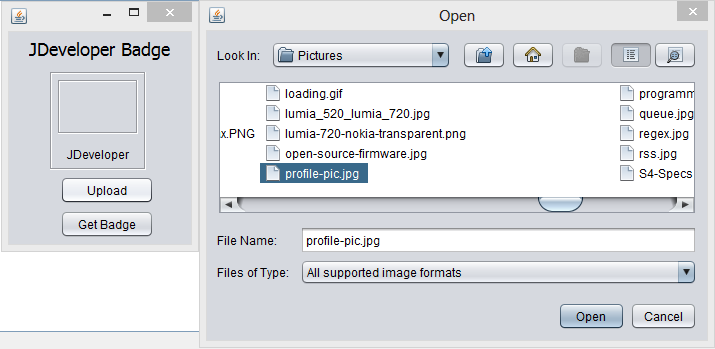
chooser.setFileFilter(new FileFilter() { @Override public String getDescription() { return "All supported image formats"; } @Override public boolean accept(File f) { if (f.isDirectory()) { return true; } else { return f.getName().toLowerCase().endsWith(".png") || f.getName().toLowerCase().endsWith(".jpeg") || f.getName().toLowerCase().endsWith(".jpg") || f.getName().toLowerCase().endsWith(".gif"); } } }); |
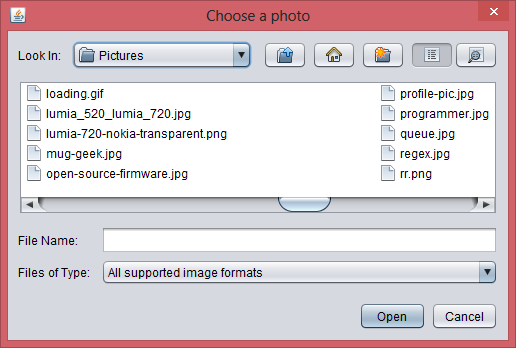
As you can see, our chooser now displays jpeg, jpg, gif, png images and “All supported image formats”.
| Don’t judge me |
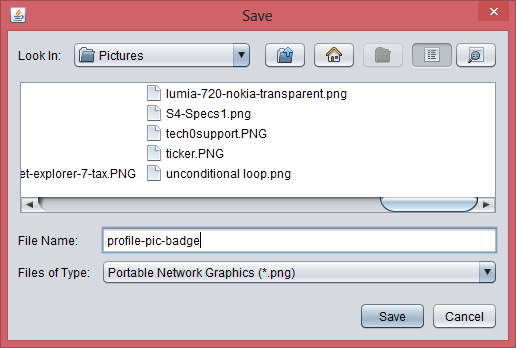
Creating a Save Dialog
Now our JDeveloper Badge is ready so let us allow the users to save the badge on their machines. Creating a save dialog is almost similar to the open dialog. Create an actionPerformed event for the Get Badge button. If using NetBeans IDE just double click the button to enter it’s actionPerformed event. But, before getting into save dialog, we have to make the image ready for saving.
For creating the badge we would capture a part of our screen i.e badgePanel and then convert it to a image (learn about screen capturing in java). After that, we will push the save dialog and let users choose their desired saving location. Users can type in their desired file name or choose an already existing file(will be overwritten). Finaaly, users will be greeted with a Message Dialog depending upon the action result.
|
1 2 3 4 5 6 7 8 9 10 11 12 13 14 15 16 17 18 19 20 21 22 23 24 25 26 27 28 29 |
Rectangle rec = badgePanel.getBounds(); BufferedImage badge = new BufferedImage(rec.width, rec.height, BufferedImage.TYPE_INT_ARGB); badgePanel.paint(badge.getGraphics()); JFileChooser chooser = new JFileChooser(); chooser.setFileSelectionMode(JFileChooser.FILES_ONLY); int res = chooser.showSaveDialog(JFileChooserEx.this); if (res == JFileChooser.APPROVE_OPTION) { File file = chooser.getSelectedFile(); try { // Writing the captured area to a png image ImageIO.write(badge, "png", file); JOptionPane.showMessageDialog(JFileChooserEx.this, "The Image was Saved Successfully!", "Success!", JOptionPane.INFORMATION_MESSAGE); } catch (IOException ex) { JOptionPane.showMessageDialog(JFileChooserEx.this, "Oops! Something gone wrong while saving." + ex.getMessage(), "Error!", JOptionPane.ERROR_MESSAGE); } } else { JOptionPane.showMessageDialog(this, "Dialog cancelled by the user"); } |

As we are writing the file as png (why png?), so you would be interested in implementing a FileFilter for .png files.
|
1 2 3 4 5 6 7 8 9 10 11 12 13 14 15 16 |
chooser.setFileFilter(new FileFilter() { @Override public String getDescription() { return "Portable Network Graphics (*.png)"; } @Override public boolean accept(File f) { if (f.isDirectory()) { return true; } else { return f.getName().toLowerCase().endsWith(".png"); } } }); |
You may have already figured out two major flaws. The first being – if you don’t type .png yourself at the end, the image is saved in a Unknown File format rather than PNG format. Although the file will be written correctly but your OS(Windows/Mac) will not be able to relate it with an app and thus will provide with ‘Open With…’ Dialog. To fix this, we would programmatically append .png in the end of file name, if the user doesn’t typed it himself.
|
1 2 3 4 5 6 7 8 9 |
if (res == JFileChooser.APPROVE_OPTION) { File file = chooser.getSelectedFile(); /* If the user didn't typed .png himself */ if (!chooser.getFileFilter().accept(file)) { System.out.println("Absolute Path: "+file.getAbsolutePath()); file = new File(file.getAbsolutePath() + ".png"); } ..................... |
The accept method of our file filter will reveal if the File chosen is in png format or not and if not we will append it.
Another major issue is that if you choose an existing file, JFileChooser overwrites the file without asking for a confirmation. Which may get very annoying for some users. To fix this you could create your own boolean logic or override the approveSelection() method of our chooser.
|
1 2 3 4 5 6 7 8 9 10 11 12 13 14 15 16 17 18 19 20 21 22 23 24 25 26 27 |
JFileChooser chooser = new JFileChooser() { @Override public void approveSelection() { File f = getSelectedFile(); if (f.exists()) { int result = JOptionPane.showConfirmDialog(this, "Do you want to overwrite the existing file?", "File already exists", JOptionPane.YES_NO_CANCEL_OPTION); switch (result) { case JOptionPane.YES_OPTION: super.approveSelection(); return; case JOptionPane.NO_OPTION: return; case JOptionPane.CLOSED_OPTION: cancelSelection(); return; case JOptionPane.CANCEL_OPTION: cancelSelection(); return; } } super.approveSelection(); } }; |
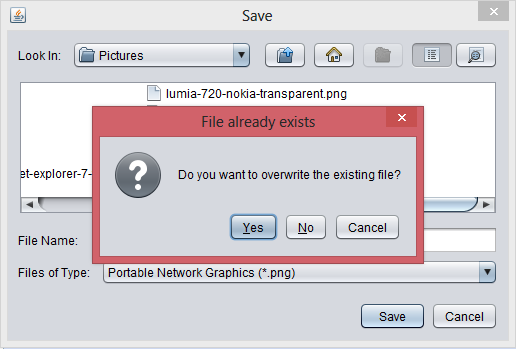
Now if select you select an existing file and click save, JFileChooser will let you confirm your selection. Then if you select ‘Yes’ from the confirmation dialog, the file will be overwritten and finally you’ll be greeted with the message “The Image was Saved Successfully!” as earlier. Whereas, if you chose ‘No’ then the file will not be saved and you’ll be returned to JFileChooser to chose any other file. And if you chose ‘Cancel’ or clicked ‘X’ icon, JFileChooser will close and you’ll be greeted with the message “Dialog cancelled by the user”.
Customizing JFileChooser
As you have noticed the standard JFileChooser has some pre-configured settings like it contains two selection buttons – Open/Save and Cancel – and few extra buttons like Home, ‘New Folder’ and ‘Up one level’ etc. Apart from these there are a lot of settings that can be tweaked.
Setting File Name
As you may noticed in many commercial softwares that when saving a file, the file name field is pre-filled with some text. For example, in Microsoft products the default file name is ‘Untitled-1’. It’s done to provide a hint for the file name or for people in hurry :P. setSelctedFile can be used for this purpose:
chooser.setSelectedFile(new File(“JDeveloper-Badge.png”));
Displaying Directories Only
There are times when you just need to work with folders(directory). For example when installing a new software. You can easily hide files and display only the folders:
chooser.setFileSelectionMode(JFileChooser.DIRECTORIES_ONLY);
Hidden Files
If your developing an administrative app, you might even need to access hidden files on the OS. Hidden files can be made visible in JFileChooser by setting FileHiding to false.
chooser.setFileHidingEnabled(false);
FileFilter Class
If you have a multimedia app, it might support very different kinds of file types and there could also be multiple JFileChooser for different actions. So keeping re-usability of code in mind it would be better to define different FileFilter class for different categories of file types.
|
1 2 3 4 5 6 7 8 9 10 11 12 13 14 15 16 17 18 19 20 21 22 23 24 25 26 27 28 29 30 31 32 33 34 35 36 37 38 39 40 41 42 43 44 45 46 47 48 |
public class ImageFilter extends FileFilter { //Accept all directories and all gif, jpg, jpeg or png files. @Override public String getDescription() { return "All supported image formats(*.png,*.jpeg,*.jpg,*.gif)"; } @Override public boolean accept(File f) { if (f.isDirectory()) { return true; } else { return f.getName().toLowerCase().endsWith(".png") || f.getName().toLowerCase().endsWith(".jpeg") || f.getName().toLowerCase().endsWith(".jpg") || f.getName().toLowerCase().endsWith(".gif"); } } } public class VideoFilter extends FileFilter { //Accept all directories and all mpeg, mp4, wmv or flv files. @Override public String getDescription() { return "All supported video formats(*.mpeg,*.mp4,*.flv,*.wmv)"; } @Override public boolean accept(File f) { if (f.isDirectory()) { return true; } else { return f.getName().toLowerCase().endsWith(".mpeg") || f.getName().toLowerCase().endsWith(".mp4") || f.getName().toLowerCase().endsWith(".flv") || f.getName().toLowerCase().endsWith(".wmv"); } } } ............... chooser.setFileFilter(new ImageFilter()); chooser.setFileFilter(new VideoFilter()); ................ |
 |
| Multiple FileFilters |
All FileFilter
When you apply a FileFilter although all the unsupported files get’s hidden but a user can select “All Files” from the “Files of Type” field and all the unsupported files would also become visible. This can be fixed by disabling “All Files” FileFilter:
chooser.setAcceptAllFileFilterUsed(false);
Default Directory
You can also set a current directory for the JFileChooser, by default it opens user’s default directory.
JFileChooser chooser = new JFileChooser(“C:\Program Files\
My App”);
OR
File curDir = new File(“C:\Program Files\My App”);
chooser.setCurrentDirectory(curDir);
As Java is a cross-platform technology your app would be executed in many types OS which may have a different type of File Structure or File Management System. So there could be a possibility that the OS uses a different character as the File Separator. For example, ‘/’ in Unix. Therefore, hard coding ” as the File Separator is strongly not recommended.
Setting user’s ‘My Pictures’ folder as the current directory:
JFileChooser chooser = new JFileChooser(System.getProperty(“user.home”) + System.getProperty(“file.separator”)+ “Pictures”);
If in any case the current directory set by the application isn’t available or couldn’t be found, the JFileChooser will automatically open the default directory (yay!).
Multiple Selection
You can let users choose multiple files in one go by setting the MultiSelectionEnabled to true. Here’s a sample code (only relevant part)
|
1 2 3 4 5 6 7 8 9 |
................... chooser.setMultiSelectionEnabled(true); int res = chooser.showOpenDialog(JFileChooserEx.this); if (res == JFileChooser.APPROVE_OPTION) { File[] files = chooser.getSelectedFiles(); // Creating ImageIcon out of the selected file ................... |
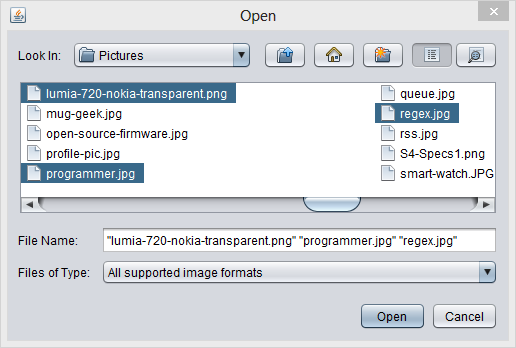 |
| Use CTRL to select multiple files |
Custom Dialog Title
By default JFileChooser displays ‘Open’ in the title bar for a open dialog and ‘Save’ for a save dialog. You can set a custom title through the setDialogTitle method.
chooser.setDialogTitle(“Choose a photo”);
Changing Button Text
Similarly we can also customize the text for action Buttons i.e Open and Save.
chooser.setApproveButtonText(“Upload”);
Note: Above method doesn’t work in conjunction with chooser.showSaveDialog(JFileChooserEx.this); Maybe it’s a issue with NetBeans IDE or a Java bug. Alternatively, you can use:
int res = chooser.showDialog(JFileChooserEx.this, “Save Badge”);
Look and Feel
JFileChooser provides different features in different look and feels(themes). What you have been seeing till now was the NimbusLookAndFeel. Here’s a preview of JFileChooser in some other Look and Feels:
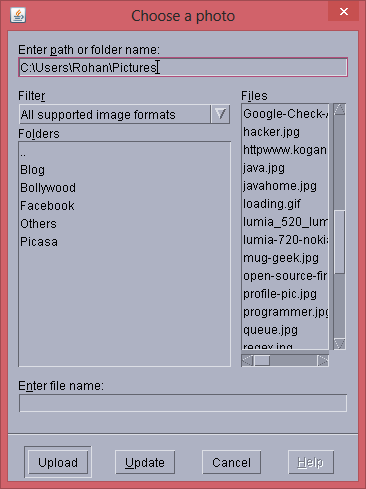 |
| com.sun.java.swing.plaf.motif.MotifLookAndFeel |
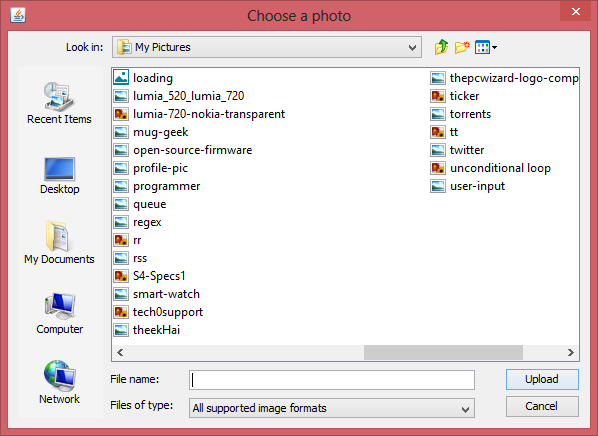 |
| com.sun.java.swing.plaf.windows.WindowsLookAndFeel |
Note: Not all Look and Feel work on every OS. If you’re developing a cross platform app, you can either use the default CrossPlatformLookAndFeel (Metal) or get native SystemLookAndFeel.
UIManager.setLookAndFeel(UIManager.getCrossPlatformLookAndFeelClassName());
UIManager.setLookAndFeel(UIManager.getSystemLookAndFeelClassName());
 |
| Default Metal Theme |
You can set a Look and Feel in the main method if you want to change the Look and Feel of all the components including the JFrame. Whereas, if you want to change the L&F for only the JFileChooser component then you can set it before you initialize the chooser and reset it again when done with the chooser:
|
1 2 3 4 5 6 7 8 9 10 11 12 13 14 15 16 17 18 19 20 21 |
try { UIManager.setLookAndFeel("com.sun.java.swing.plaf.nimbus.NimbusLookAndFeel"); } catch (Exception ex) { ex.printStackTrace(); } JFileChooser chooser = new JFileChooser(); ............... int res = chooser.showOpenDialog(JFileChooserEx.this); try { UIManager.setLookAndFeel("com.sun.java.swing.plaf.nimbus.NimbusLookAndFeel"); } catch (Exception ex) { ex.printStackTrace(); } if (res == JFileChooser.APPROVE_OPTION) { ............... |
| My very own JDeveloper Badge |
And finally this post comes to end :P, though I know there is still a scope for improvement. Share your doubts/feedback in the comments section below, would love to hear from you.
You can download the final result i.e executable jar file from here. If you still have any issues, please consider downloading the whole NetBeans project. All codes are well-explained within comments.
Help your Java friends by sharing this article. And don’t forget to – like ThePCWizard on Facebook and subscribe to RSS feeds.