// Watch a video tutorial on videos page
How to establish a connection between front end and back end in just 10 Steps.
In my case, front end is Java GUI(using NetBeans IDE) and back end is MySql.
 |
| Database Connectivity(JDBC) |
Steps :-
1 Create a database in your RDBMS(MySql in this example)
2 Create a table and insert some rows.
3 Open NetBeans and create a project
4 Add ‘MySql JDBC Driver’ Library in your project(Right click on project icon » Properties » Libraries » Add Library » MySql JDBC Driver).
5 Create a new JFrameForm under the project.
6 Insert a JTable swing component.
7 Edit it’s content according to your requirement(Right click » choose Table Contents).
8 Under your package and before class starts write the following codes in the source tab.
import java.sql.*;
import javax.swing.JOptionPane;
import javax.swing.table.DefaultTableModel;
9 Insert a button to view the data when we click.Write the coding on the button’s actionPerformed event.
DefaultTableModel model=(DefaultTableModel) jTable1.getModel();
String sql=”Select * from Table_name“;
try {
Class.forName(“com.mysql.jdbc.Driver”);
Connection con= (Connection) DriverManager.getConnection(“jdbc:mysql://localhost:3306/yourdatabasename“,”yourmysqlid“,”yourmysqlpassword“);
/*As we are creating a connection on a local computer we will write the url as jdbc:mysql://localhost:3306 */
Statement stmt=con.createStatement();
ResultSet rs = stmt.executeQuery(sql);
while (rs.next())
{
String no = rs.getString(“NO”);
String title= rs.getString(“TITLE”);
String auth= rs.getString(“AUTHOR”);
String type= rs.getString(“TYPE”);
String pub= rs.getString(“PUB”);
String qty= rs.getString(“QTY”);
String amt= rs.getString(“AMOUNT”);
model.addRow(new Object []{
no,title,auth,type,pub,qty,amt});
}
}
catch(Exception e) {
JOptionPane.showMessageDialog(this, e.getMessage());
}
10 Change the codes in blue according to your database.
Run the file and you are done to view the contents in your database in GUI environment.
Please comment if you are facing any problem.
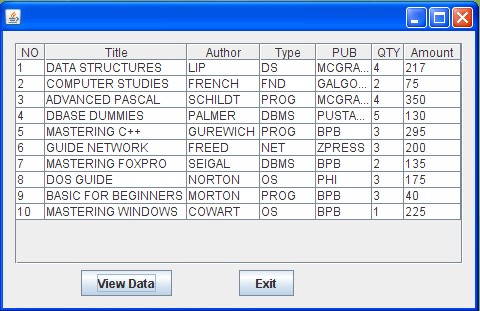 |
| Run View |
If this post helped you just give your few seconds in sharing this so that others could be helped too.