After viewing the data of a database in GUI, now we will learn how to insert the data through GUI in database.
| Database Connectivity(JDBC) |
1 Follow the 1-5 steps of Viewing Data in GUI.
Note: It is not necessary to insert some rows in the table in the 2nd step.
Note: It is not necessary to insert some rows in the table in the 2nd step.
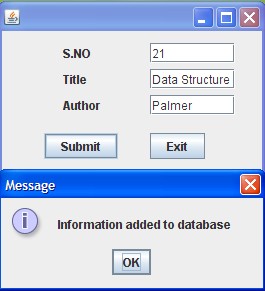
2 In the design view,insert text-fields according to your database and a submit button.
3 Under your package and before class starts write the following codes in the source tab.
import java.sql.*;
import javax.swing.JOptionPane;
4 Write the coding on the button’s actionPerformed event for the connectivity.
try {
Class.forName(“com.mysql.jdbc.Driver”);
Connection con= (Connection) DriverManager.getConnection(“jdbc:mysql://localhost:3306/database1“,”root”,””);
Statement stmt=con.createStatement();
}
catch(Exception e) {
JOptionPane.showMessageDialog(this, e.getMessage());
}
JOptionPane.showMessageDialog(this, e.getMessage());
}
5 Now, in the try block below the line Statement stmt=con.createStatement(); , write the code for taking input from the user through the text-fields you created earlier and for executing your sql query.
String no = jTextField1.getText();
String title = jTextField2.getText();
String auth = jTextField3.getText();
String sql=”Insert into library values(‘”+(no)+”‘,'”+(title)+”‘,'”+(auth)+”‘)”;
stmt.executeUpdate(sql);
Note: In the brackets first symbol is a single apostrophe ( ‘ ) and then a double inverted comma ( “ ). Same will be followed before and after each variable.
7 Change the codes in blue according to your database.
8 Run the file(Shift + F6) and you are ready to enter the data through your GUI.
 |
| Run View |