Simple steps on how to update or delete data of a table through a GUI applications in NetBeans IDE.
1 First, follow the steps for searching the data through a GUI. This is to make sure that you are able to bring the data in the text-field for further updation or deletion.
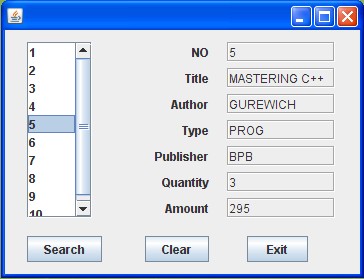 |
| Run View for Searching Data |
2 Make sure you have made the text-fields as editable. To make them editable, select all the text-fields and right click. Now, select properties and checkmark(if, unchecked) the editable option.
3 Add a new button and rename it as “Update”. Now on the Update button’s actionperformed event
try {
Class.forName(“com.mysql.jdbc.Driver”);
Connection con= (Connection) DriverManager.getConnection(“jdbc:mysql://localhost:3306/database1″,”root”,””);
Statement stmt=con.createStatement();
String num = (String) jList1.getSelectedValue();
String no=jTextField1.getText();
String title=jTextField2.getText();
String auth=jTextField3.getText();
String type=jTextField4.getText();
String pub=jTextField5.getText();
String qty=jTextField6.getText();
String amt=jTextField7.getText();
String sql1 = “Update library set NO='” + (no)+ “‘, TITLE='” + (title)+ “‘, AUTHOR='” + (auth)+ “‘, TYPE='” + (type)+ “‘, PUB='” + (pub)+ “‘, QTY='” + (qty)+ “‘, AMOUNT='” + (amt)+ “‘ where NO = ‘” + (num) + “‘”;
stmt.executeUpdate(sql1);
}
catch(Exception e) {
JOptionPane.showMessageDialog(this, e.getMessage());
}
4 To make your program more better you can make the text-fields empty when the user has completed task of updating his table. Also, you can show a Message Box stating that the update was successful.
To do this add the following codes after/below the line – stmt.executeUpdate(sql1);
jTextField1.setText(“”);
jTextField2.setText(“”);
jTextField3.setText(“”);
jTextField4.setText(“”);
jTextField5.setText(“”);
jTextField6.setText(“”);
jTextField7.setText(“”);
JOptionPane.showMessageDialog(null, “Table LIBRARY Updated!”);
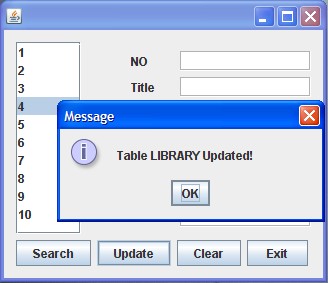 |
| Run View for Updating Database |
You can see that when a user clicks the update button the text-fields becomes empty and a message pops-ups stating that the table was updated successfully!
5 Now, for deleting a row from a database. Insert one more button and rename it to “Delete”.
6 On Delete button’s actionPerformed event
try {
Class.forName(“com.mysql.jdbc.Driver”);
Connection con= (Connection) DriverManager.getConnection(“jdbc:mysql://localhost:3306/database1″,”root”,””);
Statement stmt=con.createStatement();
String num = (String) jList1.getSelectedValue();String sql2 = “Delete from library where NO = ‘”+(num)+”‘”;
stmt.executeUpdate(sql2);JOptionPane.showMessageDialog(null, “Row deleted from the database!”);}catch(Exception e) {JOptionPane.showMessageDialog(this, e.getMessage());}
 |
| Run View for Delete |
Remember to change the codes in blue according to your database and your GUI.
Please comment, if you are not able to follow.
//watch a video tutorial for java database connectivity on the videos page