How to use JDialog and JOptionPane(Java GUI programming) in Java Desktop Application through NetBeans IDE.
You can think off a dialog as a simple pop-up window that can display a warning or even asks for a confirmation. eg- A dialog showing confirmation “Do you really want to delete this information?”
You can also use a dialog to request some information from the user.
By reading the above meaning of dialog you must have already decided that how would you use it in your project.
Java swing provides four types of pre-build Dialogs-
JDialog
JOptionPane
JFileChooser
JColorChooser
JDialog provides a window equipped close icon. It is the most flexible dialogs as you can create your own layout or interface. It’s just like another JFrameForm.
1 – Create a new form under your package and design it according to your needs.
2 – In the palette window expand Swing Windows and drag the Dialog control onto the form.

3 – Nothing appeared on your screen, you’re doing right! Now expand ‘Other Components’ in the inspector window.(If the inspector is not visible on your workspace then go to Window> Navigating> Inspector).
4 – Right click on the JDialog and choose ‘Change Variable Name’. Rename it to anything, I am renaming this as ‘simpleDialog‘.
5 – Now double click the simpleDialog. NetBeans will take you to the design view of the dialog. Here you can drag & drop components as you do for your form.

6 – Right click your OK button and select action>actionPerformed under events.
7 – Here, write the following code to close the dialog.
simpleDialog.dispose();
// If you have ever read my tutorials, you may know what different colors in the codes mean
8 – Click the dialog and in the properties panel mention its minimumSize otherwise it will get shrunk to 0x0 pixels.

9 – Now go back to your form by double clicking JFrame under the inspector window or you can also go back by double click anywhere in the JDialog.
10 – Right click the ‘Open JDialog’ button and go to Events>Action>actionPerformed and write the following code to display the Dialog.
simpleDialog.setVisible(true);
11 – Run your file(Shift + F6) to see the results!

The JOptionPane is a swing window control which has built in Dialog styles. It is a abstract class that means it does not require to be initialized before it’s use.
You can customize all of the four elements according to your needs. A JOptionPane can also hold a textfield if some information is required from the user.
1 – Right click ‘Open JOptionPane’ and select action>actionPerformed under events.
2 – Write the following code to display a simple message.
JOptionPane.showMessageDialog(this, “This is a simple dialog“);
3 – Click on the yellow bulb on the left most line and select ‘Add import for javax.swing.JOptionPane’.
4 – Save and run your file(Shift + F6). Click on ‘Open JOptionPane’ to see your results.

Unlike JDialog, you don’t need to set the minimumSize for JOptionPane. Moreover, you don’t need to write any method to close the dialog, it will automatically get close once you click the OK button.
In the above example, we only tried the message element of the JOptionPane. So, lets move onto a complex example.
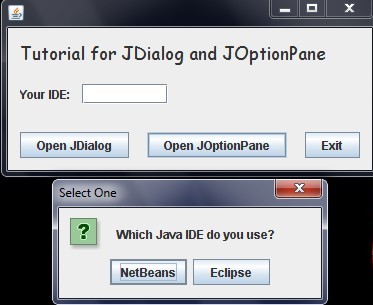
I have added two more components on my form(Label and TextField). Now we will show the user a option dialog, in which he would choose his preferred choice.
Write the following for the ‘Open JOptionPane’ button –
String[] choices= {“NetBeans”,”Eclipse”};
int response=JOptionPane.showOptionDialog(this, “Which Java IDE do you use?“, “Select One“, JOptionPane.DEFAULT_OPTION, JOptionPane.QUESTION_MESSAGE, null, choices, choices[0]);
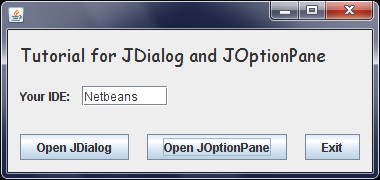
if (response == 0){
jTextField1.setText(“NetBeans“);}else if (response == 1){jTextField1.setText(“Eclipse“);
}elsejTextField1.setText(“No Choice“);
Explanation – First, we create a string array with variable name choices in which we stored our options. Then we displayed Option Dialog to the user by using the method JOptionPane.showOptionDialog. In it’s constructor we mentioned it’s parent window as this(the current window) and then typed our message between the double-qoutes. After this we mentioned it’s title. Then we chose JOptionPane.DEFAULT_OPTION and JOptionPane.QUESTION_MESSAGE as it’s optionType and messageType respectively. We set icon property to be null because we don’t want show any icon on the toolbar of the window. Finally, we put choices declared earlier in the options property. Choices[0] – zero here is the first string in our string array i.e NetBeans – just makes NetBeans as the highlighted value. We store the selected option in an integer variable response.
Then if the user selected the first choice i.e 0-NetBeans then NetBeans will displayed in the text-field and if the user selects second choice i.e 1-Eclipse then Eclipse is displayed in the text field. However, if none is selected then “No Choice” will be displayed. This may be the case when user clicks on the cross icon.
InputDialog: This provides a way ( textfield, combobox or list) for the user to enter data. It always includes two buttons- OK and Cancel. It can be created by using the method showInputDialog().
Confirm Dialog: This asks a user to confirm some information. It includes buttons like Yes, No, OK and Cancel. It can be created using the method showConfirmDialog().
Values Possible for messageType property of JOptionPane Dialogs
